Starter Course Shingles Upside Down
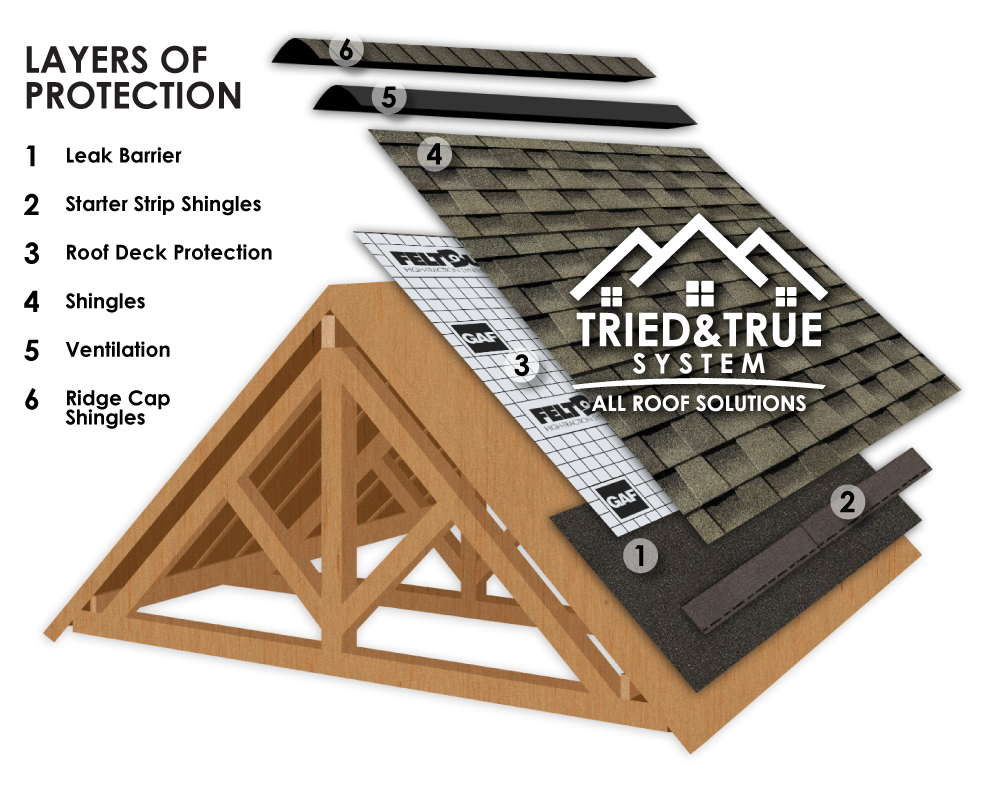
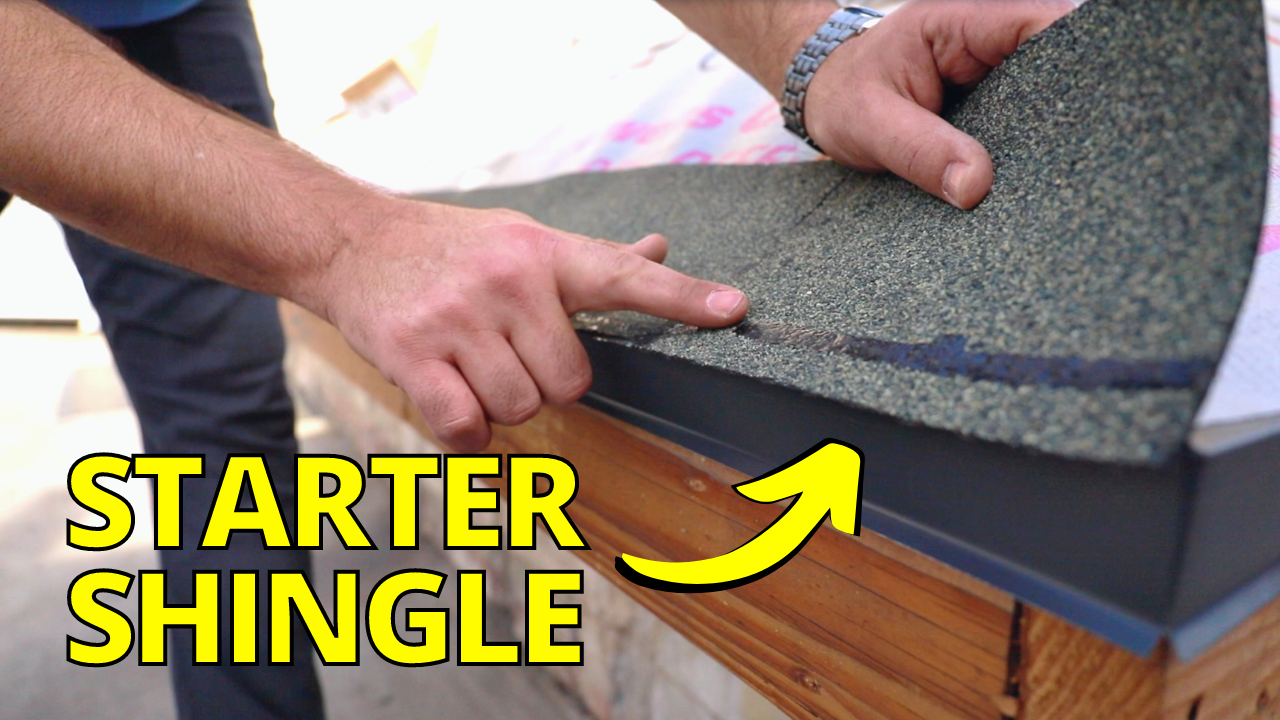
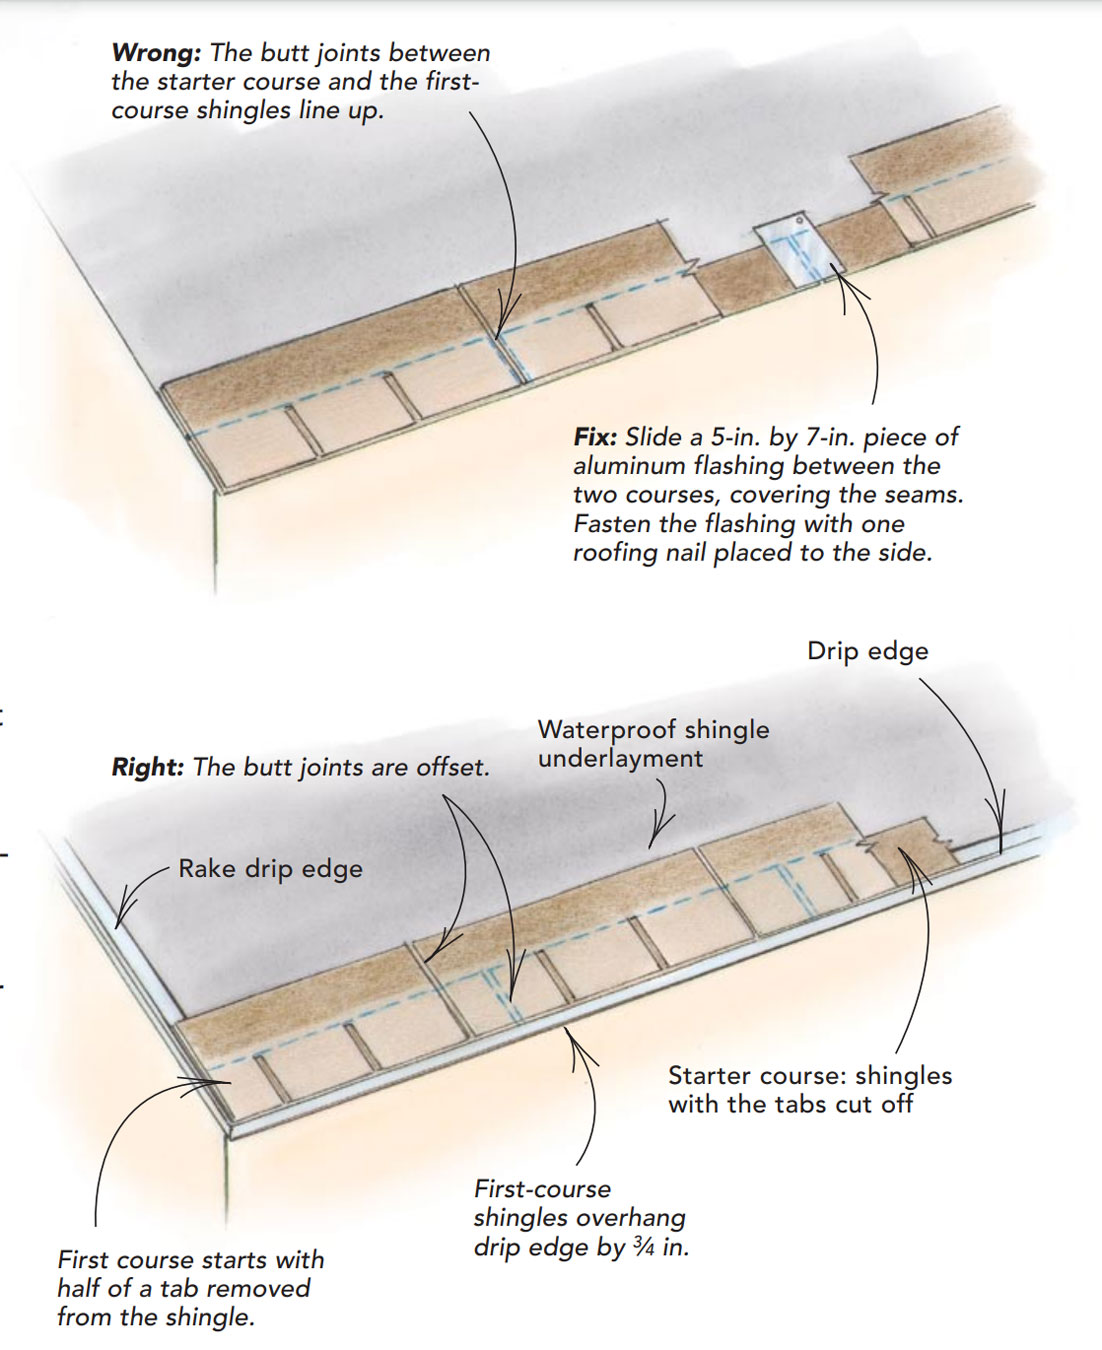
Starter Course Shingles Upside Down - Using the top part of an architectural shingle without the adhesive as “starter“ is effectively useless. Place the shingle upside down on a sheet of plywood and use a straightedge to. You shouldn't tar your drip edge as your shingles are not waterproof but rather water shedding. (upside down) same guy who puts drip edge lip over ice shield. Here’s a short guide to cutting and installing these starter shingles on your roof. So, you nail your starter just behind the drip edge; I don't think the wrapper says to let the starter course hang 3 over the gutter! Or use both top and bottom as starters. This only works with three tab shingles because they are flat and can be flipped. Put starter upside down (top and bottom, not front and back) hang over 3 inches for gutter and put your first course at least 6 inches from seam of starter. If it's a laminate the two pieces are actually equal. You shouldn't tar your drip edge as your shingles are not waterproof but rather water shedding. I don't think the wrapper says to let the starter course hang 3 over the gutter! So, you nail your starter just behind the drip edge; Working from left to right, they continue with the starter course and full shingles until they have enough coverage to continue up the roof with full shingles. Here’s a short guide to cutting and installing these starter shingles on your roof. This only works with three tab shingles because they are flat and can be flipped. Is this a better solution? Or use both top and bottom as starters. We used to use old, left over shingles as well, but we never bothered to rip them, just layed them on full, upside down. Reestablishing the starter course when shingling around a dormer or other obstruction on the roof deck that interrupts the starter course, run shingles to a point past the obstruction, then strike a new set of bond lines using the end of a shingle as a reference point. The proper way to adapt three tabs as starters is to trim the. This way, your first run of shingle is more wind resistant. This only works with three tab shingles because they are flat and can be flipped. The proper way to adapt three tabs as starters is to trim the tabs off the shingle along a line across the tops of the cutouts. Cut the starter and save the other half. Later, we’ll need to lift the shingles in this course to slip shingles in from below, so nailing high is a necessity. Using the top part of an architectural shingle without the adhesive as “starter“ is effectively useless. Working from left to right, they continue with the starter course and full shingles until they have enough coverage to continue up. So i ran into a guy saying the starter strips are supposed to be tar down. That would have come with instructions though. Seal line is on the drip edge. When i got down to the edge i was surprised how easily the last row popped off. It’s far better to measure down 7 in. If these first shingles are not installed correctly, there will be problems with the entire set of shingles. Using the top part of an architectural shingle without the adhesive as “starter“ is effectively useless. Here’s a short guide to cutting and installing these starter shingles on your roof. So i ran into a guy saying the starter strips are supposed. (upside down) same guy who puts drip edge lip over ice shield. You shouldn't tar your drip edge as your shingles are not waterproof but rather water shedding. That would have come with instructions though. Or use both top and bottom as starters. Reestablishing the starter course when shingling around a dormer or other obstruction on the roof deck that. Here’s a short guide to cutting and installing these starter shingles on your roof. Cut the starter and save the other half to finish the top of the run. Place the shingle upside down on a sheet of plywood and use a straightedge to. If these first shingles are not installed correctly, there will be problems with the entire set. When i got down to the edge i was surprised how easily the last row popped off. (upside down) same guy who puts drip edge lip over ice shield. Every great roof starts with the right foundation—meet the starter shinglein this step of your roof replacement, slopepro installs the starter shingle—the fi. A starter strip can be cut and inverted. In addition, this starter course protects the roof by filling in any gaps. Often, however, a starter course is made of cut shingles. So, you nail your starter just behind the drip edge; Here’s a short guide to cutting and installing these starter shingles on your roof. This way, your first run of shingle is more wind resistant. (upside down) same guy who puts drip edge lip over ice shield. If it's a laminate the two pieces are actually equal. Cut the starter and save the other half to finish the top of the run. Put starter upside down (top and bottom, not front and back) hang over 3 inches for gutter and put your first course at. Later, we’ll need to lift the shingles in this course to slip shingles in from below, so nailing high is a necessity. Personally i like to use a 3 tab shingle with the tabs cut off. Or use both top and bottom as starters. To maintain the proper offset, they lay the next shingle upside down and use the notch on the previous shingle to locate the cut. Some starter strip rolls from the big box rip off stores have a peal off adhesive side that is supposed to stick to the roof, so it does go down. Best thing is to look at the directions and pictures on wraper. Seal line is on the drip edge. This way, your first run of shingle is more wind resistant. It’s far better to measure down 7 in. If it's a laminate the two pieces are actually equal. (upside down) same guy who puts drip edge lip over ice shield. The first shingle is then lapped over the edge by 1/2 to 3/4 to provide a drip edge off the roof or into the gutter. A starter strip can be cut and inverted shingles, or a roll product can be used called shingle starter. if you saw neither, but simply the first course going down over the underlayment, you have reason to be concerned. Cut the starter and save the other half to finish the top of the run. The installer wants to come back and install them correctly by removing the first 6 ft of shingles and installing new ice and water shield. That would have come with instructions though.
Asphalt Roof Shingling Basics JLC Online Roofing
roofing starter strip application Torri Nunn

Roofing Sales Cheat Sheet BidList
How to Install Starter Strip on a Shingle Roof Roof Repair Specialist
:max_bytes(150000):strip_icc()/starter-course-layers-shingles-offset-b2be1c25-9b97363ef15c454987af8916d91e7ac2.jpg)
Your StepbyStep Guide to Installing Cedar Shake Siding

How To Install Starter Strip Roof Shingles Roof Shingles For
:max_bytes(150000):strip_icc()/placing-starter-shingles-abc4aa4c-407d82e0b6094ea399dd551a6a6a8d33.jpg)
How to Install 3Tab Roof Shingles
10 Roof Goofs and How to Fix Them Fine Homebuilding

How To Shingle A Roof Valley Roof Shingles For Australian Homes
.jpg)
Replacing Roof Shingles IBUILDIT.CA
In Addition, This Starter Course Protects The Roof By Filling In Any Gaps.
Is This A Better Solution?
When I Got Down To The Edge I Was Surprised How Easily The Last Row Popped Off.
Starting With The First Full Shingle That Fits Above The Plank, We Nailed The First Course With Two Nails At The Top Of Each Shingle — Not On The Nail Line.
Related Post: